Search This Blog

Monday, October 30, 2023

Halloween Party Theme - Stranger Things

 It's been a hot minute since I posted, but I intend to get caught up with my party theme blogs, starting with this year's theme - Stranger Things!  I was struggling to come up with an idea that would work for a group of tweens and teens, to center the scavenger hunt upon, and a great friend, Kristie, suggested Stranger Things.  It was the perfect mix of the glorious 80s for the adults and pop-culture for the teens.   We did not wander toward the scary side of the show with decor or the hunt, but stuck with the iconic items.

First, the scavenger hunt.  

We have learned from previous years that we can't hide any clues before the party because the kids would look for them.  Therefore, the first clue sent them out of the house and into the neighborhood.  I did give the neighbors a heads up, in case they wondered why kids were taking selfies with their ghosts!

Below is my master list with notes:

1. On the show, Jonathan was a hobbyist photographer.  For your first challenge, you must go about the neighborhood and take photos of your group at certain homes.  Creative posing can gain you extra points, but do not touch the neighbors decorations or step in their yard.   All photos from the sidewalks unless otherwise noted.

    1. A photo with one or more ghosts
    2. A photo with a spider’s capture
    3. A photo with a FLAMINGO skeleton
    4. A photo with a lighted pumpkin scene
    5. A photo with a cemetery in the background

After all photos are taken, return to an assigned adult for verification and your next challenge.


2. On the show, Mike, Dustin, Will, and Lucas were heavy into D&D. 

Roll the D20 die until it lands on 16 or above. Adult to verify.


3. Eleven discovered there were other people like her who had escaped, and they had tattoos similar to hers.  Roll the D8 die to know who to see next.  [Find the adult with the tattoo that matches the number on the die]


4.  In order to communicate on several occasions, our heroes used Morse code.  Decipher the message below to determine who to see next.  

[Using an online coder, the message simply said "Find [assigned adult]"]


5. In Season 3, Dustin uses his ham radio to contact his girlfriend Suzie for Planck’s constant, but she refuses to tell him unless he sings to her their song.  

“Turn around” and sing the whole Neverending Story theme song for your next clue. 


6. In Season 1, Eleven hides in Mike’s basement in a blanket fort under a table.  Find the blanket “fort” lay on the “table”, and read the next clue upside down. [They will be facing the Big Green Egg - underline letters on clue to spell (assigned adult's name)].


7. One of the greatest things about Stranger Things is all of the iconic 80s references in the show from the hair, to the clothes, and the music.   Your next challenge is to see [assigned adult] and answer 5 80s trivia questions to get your next clue.


8.  In Season 1, Will communicated with his mother using Christmas lights strung on the wall with the alphabet.    Determine from the colors below who you need to see next. [These two people were located in two different bedrooms upstairs]

YL-OR-RD-BU-GN [Team A]     OR-YL-YL-GN-GN [Team B]


9. Magazine Letter Message - Joyce receives a letter made with magazine letters with instructions on how to help rescue Hopper.  Use these supplies to create a message to tell your rescuer where you are.  Put the envelope under the door when you finish.

[Bedroom doors were left 3” open]


10. In Season 4, our hero Eddie does one last song on his beloved guitar.  Return to the living room for an air guitar challenge - Master of Puppets. 

(Youtube Master of Puppets instrumental)


11. In order to save the world, our heroes had to travel to what they called “The Upside Down”.  These gates sometimes were a bit messy to deal with.   Find the gate, reach through, and retrieve your prize!  [Rubik's cubes in a bucket covered with plastic and DIY GAK near one of the gates to our backyard]


There was some strategy to the clues - the first one got them out of the house, so I could explain the rest of the hunt to the adults, give them their envelopes, D&D die, tattoos, trivia cards, and put the prizes outside. Step 9 took them upstairs while we got the last things ready downstairs.  The adults just hung out wherever in the house, visiting and checking on football scores.  Hey - Saturday in the South.  It's a thing. 

Everyone was a good sport and had a good time running around being silly.  Our favorite part had to be watching the kids sing the Neverending Story theme, since none of them had heard it before.  Karaoke at its finest!!

Decor:
We definitely had to do the alphabet wall.  A trip to the discount store for a flower patterned sheet and some battery-operated lights from Amazon did the trick.  As an avid crafter, black paint and a brush are always handy, as well as a drop cloth to put under the sheet.  We hung the sheet using Command velcro, and cut tiny holes for small clear Command hooks to poke through and hang the lights.  


Food:
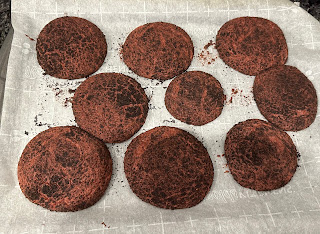
We did a potluck of favorite party foods, but had a few theme-oriented items such as pizza, Pringles, Nilla Wafers, and of course, an Eggo waffle bar!  I found this cookie recipe on Pinterest which I consider a winner on presentation and taste. 


I made them a bit smaller than the recipe called for, but they spread and bake beautifully!  I also put together a relatively low sugar (only 1/4 cup of brown sugar) peanut butter dip to accompany the Nilla Wafers. 

Costume:
Since we live in the South and it was still well over 75 degrees on party day, it was tempting to cut all of my hair off and wear a hospital gown.  I was also tempted to relive my high school years with the big hair and clothes.  My better judgement took over, and I decided to just go with a one of a kind t-shirt that I could use again.  Using my Silhouette cutting machine and software, I designed this shirt to show my support to all of my fellow Gen-X'ers who have been independent since grade school.  Fonts used are Benguiat Std and Kimberley. 


All in all, everyone had a good time and was able to hang out with friends and eat some food, which is really what we all want to do, right?  


Monday, January 7, 2019

Birthday Party Theme for All Ages - Shoot! Somebody's Turning 40!

For my DH’s 40th birthday party, I wanted to come up with activities and a theme that embraced his hobby of competitive shooting.    He has been into all things guns since he was a little guy, and it is just part of what he is.   We were going to be having several friends and their kiddos at the party, so I was definitely setting up a shooting gallery, and even had a scoring sheet. I also like to have an activity that is focused on the birthday person, so I created a trivia quiz with 40 questions about Big T that were a good mix of what family would know and what friends would know.  Some photos on the big screen from the past 40 years were quite humorous to the little ones.  As far as decorations, I kept it very simple, but did have a party favor for everyone to take home.  Regarding menu, I went with his favorites, which included BBQ catered by our friends at The Smokin’ Box and the fixings.  

TABLE DÉCOR
Like I said, I kept it simple.   I cleaned up some aluminum cans, punched holes in them to look like they had been shot, and tied black and blue balloons (his favorite colors) to them.

SHOOTING GALLERY- SCORE SHEET
The sheet is used to record how many “hits” the shooter had at each stage.  Each stage was given a cheesy name to go along with the setup and maximum points per stage.


SHOOTING GALLERY – WEAPONRY
One of Big’s T shooting buddies has a son with an extensive Nerf collection, so I asked if we could borrow from the arsenal for the party.   He did not disappoint.  In hindsight, we should have had a “range officer” with the kiddos the entire time because we had to unjam a few guns after the party was over.  Not all Nerf guns use the same kind of ammo. 

SHOOTING GALLERY-STAGES
1)   Spinneroo- I found instructions for the frame on Pinterest, and it was super easy to build, transport, and set up. 


     I made the targets using my Silhouette Cameo and the Print and Cut function.   I used a heavier weight paper than copy paper, but as you can see from the photo, I probably should have used cardstock.  I ran into a bit of a problem with the adhesive between the PVC and the binder clips during transport, so I had to do some last minute hot gluing which held during the party.  You may want to try E6000.

2)   Avengers- This one is a simple use of aluminum cans in two pyramids with Lego figures from the Avenger movie series.  

     Big T is also a huge movie buff.  To accumulate points, the shooter had to knock each of the Avengers off.

3)   Red White and Blue- This is another version of the Spinneroo stage, but uses targets like what is used with USPSA, his competition organization.

4)   Big T- This one incorporates his favorite Disney animated film, The Lion King.   Once again, the figures had to be knocked off the big T.

5)   Bad Guys- I also found the instructions for this stage on Pinterest.  https://frugalfun4boys.com/spinning-nerf-targets-diy-cardboard-toy/

     I liked the way these targets spun when they were hit.   The kiddos only recognized a couple of the bad guys (Voldemort and Darth Vader) but I was trying to span several years’ worth of movie bad guys.

6)   Bowling for Points- The instructions for this one was found on Pinterest also. https://frugalfun4boys.com/nerf-turkey-targets-thanksgiving/  

     Obviously, you can put any picture you want on the file folders to go along with your theme.  I used the Print and Cut feature again on the Silhouette for the artwork.

PARTY FAVOR – “PARTING SHOT”


When I was searching for party ideas, I saw a link for chocolate ammo in an ammo box.  I wasn’t really crazy about doing that, but it gave me an idea for making my own ammo.  
Materials needed:
Lifesavers roll
Rolos, individually wrapped
Gold Mylar paper (Michael’s)
Tape
Glue dots
Ammo box

This was quite easy. Cut 3”x4” piece of the gold paper and wrap it around the Lifesaver roll; tape to secure.  Using a glue dot, attach a Rolo candy to one end of the roll. Tada!   Candy ammo!

Please note that the shooting gallery required a table for each stage and one to display the nerf guns for choosing.   We also needed tables for food and eating, so we actually reserved one of our church’s fellowship rooms to accommodate our needs.  

Sunday, October 29, 2017

Halloween Costume and Party Ideas - Mad Scientist Lab


Due to a shortened amount of time to plan this year, we opted for a simpler costume for the hosts and simpler menu and focus more on the activities for the kiddos.   They are mostly between 7 and 12 years old, with a handful that are younger.   We tossed around some ideas and decided to go with a Mad Scientist theme because I had been waiting patiently to do a sensory activity.   One of my favorite Halloween memories is when we were blindfolded and were asked to feel of things.  It is quite interesting how you perceive something when one sense is removed.
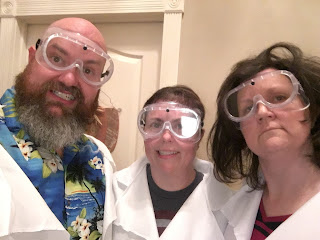
So, for our party, the idea was that our guests had arrived at Turner Up Labs, where the theory of big bangs are tested every day!   As you can see, the last lab experiment didn’t work out so great for Dr. Kay Boom and her hair.

We told them that we were in need of assistants, and the activities of the night would test their skills to see if they qualified as potential employees.   We divided the kiddos into three groups, mostly by age, and rotated them through each station.   We even created forms for everyone to fill out, but it ended up being easier to just use them when we tested their inventory skills.
INVENTORY SKILLS
We have one room that has two doors and no windows, and it happened to have a dimmer switch for one set of lights in the room.   It was perfect for the sensory activity.   The kiddos were told that they would be tested on their inventory skills, but instead of using their eyes, they would use their hands.   There were six items for them to feel and tell us how many were in each one.  As they would start to put their hand into the hole, I would ask, “How many [insert item] do you feel?”  There was quite the mixture of reactions, regardless of age.

Construction involved six shoe boxes.  I used a saucer to trace a circle on one the end of the lid and cut it out with an Exact-o knife.  Inside the box I placed a styrofoam bowl with the item to be “inventoried”.   There are many choices on the internet, but we opted for these six:
Overcooked spaghetti  as WORMS
Peeled grapes as EYEBALLS (google the how to)
Dried apricots as EARS
Cooked orzo as MAGGOTS
Bacon bits as SCABS
Popcorn kernels as TEETH
The boxes were lined up side by side on the table, and a black tablecloth from the party section of Walmart (about a dollar) was draped over the table and boxes.   Holes were cut into the tablecloth right above the holes in the boxes.  This helped with deterring anyone from peeking.   

After all of the kiddos came through, there were some mommies that were nominated to try it also, which was quite funny.   We did a big reveal to let the kids see what they had really been touching.  

 The best comment was “I will never look at bacon bits the same again.”

MIXING SKILLS
In the garage we set up two card tables side by side with a purple tablecloth, also from the party section of Walmart.  One end of the table was prepared for making slime and the other was for making pumpkin playdough.   I had researched and tried a few different slime recipes online, and my favorite was the following:
4 oz glue
½ T baking soda
food coloring or paint
1 T contact solution
Before everyone arrived, we put the glue in styrofoam bowls to keep things moving quickly.  

 Then we added the baking soda and coloring and mixed well before adding the contact solution.  Then it was STIR FAST!  It cleaned up completely in the bowl and they saw results immediately when the contact solution was added.   We purchased these 5 oz cups from Amazon to contain the slime and playdough, which were delivered while we were eating!  When the doorbell rang, we assumed it was another guest.   He did have a most convincing costume as a UPS driver.
The pumpkin playdough was truly an experiment.  It worked okay for some of the kiddos and not so great for the others.   We made the executive decision that the very youngest guests would not make it because it did end up being very messy.   

 We needed larger bowls and probably a bit more cornstarch.
The recipe I used was the following:
½ c.  canned pumpkin
½ c. cornstarch
½ t. pumpkin pie spice (I recommend using more, but we were limited with our supply)
It was funny to hear some of the girls talk about how bad the pumpkin smelled out of the can, but they really liked the pumpkin pie spice.

HYPOTHESIZING
The third station was located outside because it was the messiest activities.  There were three things for which they were to write a hypothesis:
1.  How long would it take for the burp bag to burst?
2.  How high will the soda shoot out of the bottle when the mentos were dropped in?   Which goes higher, the dark cola or the colored cola?
3. Which size tablet causes the most bubbles in the lava lamp?


Burp Bag
They were to add 1/3 c. white vinegar and ¼ c. warm water , and a drop of food coloring to a ziploc bag.   Then drop in a prepared baking soda pouch with 2 T. of baking soda, zip the bag quickly, and put it on the ground.  
I performed this experiment earlier in the day, and my bag burst in about 10 seconds.  Unfortunately, my helpers missed the memo about putting the ENTIRE pouch in the liquid mixture, so the first two groups’ mixtures reacted too quickly.   The third group’s bags expanded well, but none burst.  We believe it was because the water had cooled off while sitting outside.

To make the baking soda pouches, we used ¼ of a square napkin.  We folded it into a paper cup (remember those?) by folding in half across the diagonal and then bring the two long corners in to the middle and finish by folding back the other corner on both sides.  We added 2 T. baking soda carefully, and then put it in a 2 oz plastic cup to prevent spilling.   

We kept these inside to avoid unnecessary moisture absorption until right before.

Shooting Soda
I assumed that many had watched or heard of the Diet Coke with Mentos experiment, so I opted to use generic sodas instead of brand name to see if there was a difference.  I also purchased a variety- three colas, one red, one orange, and one yellow soda, and they were all diet. 

  Each group had a cola and a color drink to drop mentos into and watch.   The first group managed to get Big T and one of the kids soaked pretty good because they didn’t get away quick enough.   But we learned that generics don’t shoot as high as brand name, and we learned that the colored sodas don’t shoot as high as the cola.  And we also learned that it is tough to take pictures in a dark backyard.

Lava Lamp
This one surprised all of us on just how cool it was to watch.  Before everyone arrived, I filled several water bottles 2/3 full with oil and then added water up to about 2” from the top.  Each group chose two bottles and picked a color of food coloring to drop in.   They were asked how long it would take for the water to color, and their reactions when it finally happened was quite entertaining.   Then, they were to choose whether dropping a ½ tablet, a ¼ tablet, or several tiny pieces of a generic Alka-Seltzer would generate the most bubbles and test their theory.    

It was our determination that dropping several tiny pieces created the most bubbles.

Although some of our experiments didn’t work out as planned, we realized that is just part of working in a lab, right?  The real success was everyone spending some time together and just hanging out.  And we may have found a few new recruits for Turner Up Labs.  

Happy Halloween! 

Saturday, February 27, 2016

Looking for Josiah


As I was driving to work a few mornings ago, I was listening to a morning talk show ramble on about the Presidential candidates.  Mentioned were pros and cons of the various hopefuls, what they had accomplished in their pasts, and speculations on what each one would do if elected to lead our country.  My mind began to wander back to the Old Testament, as it often does when I think about politics and the leadership of our country.  

 For the past ten years, I have taught the same lessons to the second graders at our church, so I feel pretty familiar with the history of Israel.  We start with Israel wanting and getting their first king, Saul, and we go all of the way through the history of the nation of Israel, including the eventual fall of both Israel and Judah to other nations and then the return of the Jews to Jerusalem.  We talk a lot about the fact that God had one simple rule – obey my commandments.   If they just did that, then they would be blessed.  And they did, for a while.  Then they turned away from God, and even each other.    The northern kingdom of Israel had ZERO good kings after the division occurred.   Several years passed before the Assyrians took their land over, and they were known as the lost tribes of Israel after that.  The southern kingdom of Judah fared a little better, as that their kings continued in the lineage of David, but there would be years of good kings and years of bad kings.  In my mind wandering, the good king that I began thinking about was Josiah.


Josiah became king when his father died, and he was only eight years old.  When he was 16 years old, he began seeking after God.  When he was 20 years old, he began removing objects of idol worship from the country.   He even destroyed places in Israel as well as Judah.   When he was 26 years old, he ordered that the temple be cleaned up and repaired.   During this repair effort, the book of the Law was found and brought to King Josiah.  When it was read to him, he realized the sin that the country was, and had been, living in.   He was visibly upset – he even tore his clothes!   He sent to the prophetess Huldah, to inquire of God just how bad things were.   God said that evil would come to that place (Judah) because the people had forsaken Him, but that Josiah would be spared from seeing it happen.  Josiah then stood before the people and committed to follow God completely, and asked the people to do the same.  He simply “cleaned house”, in the entire land.  He also re-instituted the Passover.    The details of his reign can be found in 2 Kings 22-23 and 2 Chronicles 34-35. In verse 25 of 2 Kings 23, the Bible says “And like unto him was there no king before him, that turned to the LORD with all his heart, and with all his soul, and with all his might, according to all the law of Moses; neither after him arose there any like him.”   In 2 Chronicles 34: 33, the Bible says “All his days they departed not from following the LORD, the God of their fathers.”  

And even though Josiah did all of these good things, in 2Kings 23: 26 we are told that the anger of the Lord was not diminished because of all of the evil that former king Manasseh had done.  And several years later, Judah was captured by the Babylonians.

The United States of America is on the same path as ancient Israel.  The leadership in our country has forsaken God.  They act as though they are above the rules, the real rules – the Bible.  

I feel that we need a President who will direct the country back toward God, but in the right way, like Josiah did.  He showed the Israelites what they were doing wrong against God’s law, and what it said would happen.  They realized their sin and repented and continued to follow God, just like their leader.  

I have yet to hear “getting back to God” on anyone’s political agenda.  Considering how far the country is down the road to Hades, it would take some pretty creative and persuasive ideas to get the people to at least consider looking at God, much less actually turning to Him.  Our country needs a lot of things that are being discussed these days, like a great plan to get out of debt, but what it really needs is godly leadership.   
So, I’m looking for a Josiah on the ballot.