Search This Blog

Thursday, June 25, 2015

Retiring a Legend


When you think of retirement parties, what comes to mind?
I bet it isn’t  “BASEBALL!”  
Well, that is exactly what we did, we thought “baseball”.

A co-worker recently retired who had 40 years – yes, 4-0 years – with the company.   He is a hard-working man, who still plays recreational baseball in a senior league.   It only made sense that his party had a baseball theme.   Besides, I like a challenge and when it came to googling “retirement party baseball theme”, not much popped up. (pun intended)

Since we were having the dinner party at Old Greenbrier Restaurant, we wouldn’t be able to go all out on decorations, so we kept it simple with table “centerpieces” made up of a box of Cracker Jacks and a fake bag of peanuts.    On each table we had paper and pen for the guests to write a note to the honoree.


Our guest list was quite varied with a handful of current employees and several retirees who had not seen each other in a very long time.   Name tags were in order and easy to make using avery.com.  I used the 2x4 shipping label and put a simple graphic of a ticket stub on one side and added the event details.  I printed them and put them on a clipboard.   As people arrived, I wrote their names on the tag. 
For our main table, we had a bucket of baseballs for all of his “teammates” to sign.  (If you choose to use this idea, use ballpoint pens instead of the fine tip Sharpies.  They worked okay, but didn’t dry as quickly as I would have liked.)    I used a photo holder and added a couple of quick signs for "Autographs please!"


This was sitting next to a “baseball card” poster that one of our co-workers made with a photo of him batting with a standing ovation crowd in the background.   He even added statistics on the back.


On the dessert table, we had two buckets, one for collecting money for the honoree  and one for collecting notes and cards.  I re-worded "Take Me Out to the Ballgame" for the sign on this one.

For dessert, we opted for cupcakes from Peggy Ann Bakery, and I made cupcake toppers using Powerpoint and my Silhouette Cameo.   I found some photo clipart that I liked of baseball stuff and using the Picture Tools in Powerpoint, I cropped them to circles and then added the text.   Using the Print and Cut feature of the Cameo I was able to knock out 60 in no time flat.   


We didn’t have anything planned as far as speakers or anything like that, but there is the tradition of giving advice, well wishes, and storytelling at retirement parties.   Off the cuff, we played “pass the bat” and whoever had the bat could speak.     

We even had one person, who couldn’t make it, email me a couple of stories to read to the group.  It was a hit!  (pun intended)

After all of the speeches, we got everyone outside for a group photo and few last goodbyes.   

Simple yet fun. With never-ending hushpuppies. The way retirement ought to be.

Monday, June 15, 2015

Trash to Treasure - Ladder Back Chair Gets New Life


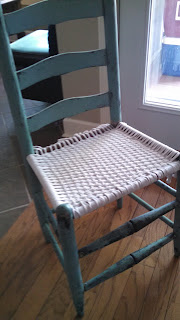
A couple of weeks ago, I was out doing a bit of junkin’ on a Saturday morning and ran across this little treasure:

When I bought it, the lady asked if I was going to make it into a planter.  That idea had crossed my mind, because I like container plants, but it quickly became my backup plan.   I decided that I would put a new bottom in it, and it wasn’t going to cost me anything but my time.
Growing up, my Granny had a few of these straight back / ladder back chairs.   I can remember sitting in them and leaning back against the wall, trying to balance just so.  She must have had them a long time, because I don’t remember them ever having cane bottoms.   She used old nylons in a basket weave pattern to make the seats.   So, I thought, if she could use old nylons, surely there were other materials that could be used as well. 
I did a bit of googling to confirm that my first plan had been used before – old tshirts.   We had recently replaced several of the hub’s undershirts, and the bag of old shirts had not made it to the trash can yet.  Normally I would not have wanted to use white (or dingy white) for this type of project, but with the paint job on the chair, I thought I would give it a try.
First job was to finish dismantling the chair bottom.  That took about 15 minutes.
Next, I cut up the tshirts.  I laid them flat on a craft table and using a rotary cutter, I trimmed the hem off of the shirt.   Then I put a yardstick on the shirt and used it as a guide for cutting the strips. Actually they are still loops at this point.    

I had plenty of shirts, so there was no reason to cut strips past the sleeves.  Plus, that length may have been a bit short.  I probably cut 30-40 loops.  I do recommend using a self-healing cutting board instead of a table.
Measure the chair bottom width and double it.  That is what length strip you will need.   For instance, if the seat bottom is 18” at its widest point, then the strips will need to be 36” long.   Depending on the size of tshirt, you may be able to get two strips from each loop.  Remember that tshirt material will stretch and curl when you pull it tight.
Wrap the strip around one side and pull tight to the other side and tie a knot.  Leave the extra length so that each one can be tied to the one next to it at the end of the project.
Continue wrapping and tying until the bottom is covered completely.  I used 38 strips. The second photo shows where I pulled the knots toward the bottom so that both sides are smooth.


The next step is the weaving.  I used a plastic ruler with a hole in one end as a shuttle.  I wrapped the strip around the front round and then pulled it tight, stuck both ends through the hole in the ruler, and weaved it between the other strips.  Pay close attention for the first few runs, so that you get UNDER both pieces and not BETWEEN.  Remember to alternate the over/under pattern on each run.   When it is pulled through to the back, tie it tight, but don’t tie it in a knot yet. Here is what my first four looked like.

  As you weave, it will become tighter and you will be weaving in a not-so-straight line and then have to scoot it over each time to get it in a straight line, or as straight as possible.  For the last two or three, I couldn’t use the ruler because there was not room for it.  I just tied the strip in a knot and fed it up and down by hand.  Occasionally I had to use the eraser end of a wooden pencil to push it through or make the hole more obvious. 
Once all of the strips had been weaved through, then I went back and pulled those good and tight and tied a knot at the back for each strip. 
Next I tied the strips to each other, side to side.

Then I trimmed the ends to neaten things up a bit.
 TADA!


And the last step was weight testing.
Although the cat, myself, and the hubs tried it successfully,  I think we all know who is going to claim this chair for himself.

If I run across another one of these treasures, I will definitely try some different colors next time to make the weaving go a bit faster. And I might be tempted to cut the strips a bit wider and use thicker material than undershirts.  All in all, I consider it a successful attempt!