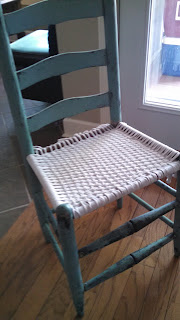
A couple of weeks ago, I was out doing a bit of junkin’ on a
Saturday morning and ran across this little treasure:
When I bought it, the lady asked if I was going to make it
into a planter. That idea had crossed my
mind, because I like container plants, but it quickly became my backup
plan. I decided that I would put a new
bottom in it, and it wasn’t going to cost me anything but my time.
Growing up, my Granny had a few of these straight back /
ladder back chairs. I can remember
sitting in them and leaning back against the wall, trying to balance just
so. She must have had them a long time,
because I don’t remember them ever having cane bottoms. She used old nylons in a basket weave
pattern to make the seats. So, I
thought, if she could use old nylons, surely there were other materials that
could be used as well.
I did a bit of googling to confirm that my first plan had
been used before – old tshirts. We had
recently replaced several of the hub’s undershirts, and the bag of old shirts had not made it
to the trash can yet. Normally I would
not have wanted to use white (or dingy white) for this type of project, but
with the paint job on the chair, I thought I would give it a try.
First job was to finish dismantling the chair bottom. That took about 15 minutes.
Next, I cut up the tshirts.
I laid them flat on a craft table and using a rotary cutter, I trimmed
the hem off of the shirt. Then I put a
yardstick on the shirt and used it as a guide for cutting the strips. Actually
they are still loops at this point.
I
had plenty of shirts, so there was no reason to cut strips past the
sleeves. Plus, that length may have been
a bit short. I probably cut 30-40 loops. I do recommend using a self-healing cutting
board instead of a table.
Measure the chair bottom width and double it. That is what length strip you will need. For instance, if the seat bottom is 18” at
its widest point, then the strips will need to be 36” long. Depending on the size of tshirt, you may be
able to get two strips from each loop.
Remember that tshirt material will stretch and curl when you pull it
tight.
Wrap the strip around one side and pull tight to the other
side and tie a knot. Leave the extra
length so that each one can be tied to the one next to it at the end of the
project.
Continue wrapping and tying until the bottom is covered
completely. I used 38 strips. The second photo shows where I pulled the knots toward the bottom so that both sides are smooth.
The next step is the weaving. I used a plastic ruler with a hole in one end
as a shuttle. I wrapped the strip around
the front round and then pulled it tight, stuck both ends through the hole in
the ruler, and weaved it between the other strips. Pay close attention for the first few runs, so
that you get UNDER both pieces and not BETWEEN. Remember to alternate the over/under pattern
on each run. When it is pulled through
to the back, tie it tight, but don’t tie it in a knot yet. Here is what my first four looked like.
As you weave, it will become tighter and you
will be weaving in a not-so-straight line and then have to scoot it over each
time to get it in a straight line, or as straight as possible. For the last two or three, I
couldn’t use the ruler because there was not room for it. I just tied the strip in a knot and fed it up
and down by hand. Occasionally I had to
use the eraser end of a wooden pencil to push it through or make the hole more
obvious.
Once all of the strips had been
weaved through, then I went back and pulled those good and tight and tied a knot at the
back for each strip.
Next I tied the strips to each
other, side to side.
Then I trimmed the ends to neaten
things up a bit.
TADA!
And the last step was weight testing.
Although the cat, myself, and the hubs tried it
successfully, I think we all know who is
going to claim this chair for himself.
If I run across another one of these treasures, I will
definitely try some different colors next time to make the weaving go a bit
faster. And I might be tempted to cut the strips a bit wider and use thicker material than undershirts. All in all, I consider it a successful attempt!


No comments:
Post a Comment